
Valentine’s Day is the perfect occasion to create something special for your loved one or even launch a themed landing page for your business. With Lovable AI, you can quickly build a beautiful Valentine website without complex coding.
In this blog, I’ll show you step-by-step how to create a Valentine website using Lovable AI, and how to use visual edits, themes, and colors to make it truly romantic and eye-catching.
💖 Step 1: Start With a Clear Prompt
Lovable AI works best when you give it a detailed and clear prompt.
Prompt:
Create a cute, romantic, and interactive Valentine webpage with a soft pastel gradient background, rounded cards, subtle shadows, smooth animations, and a modern stylish font (like Poppins).
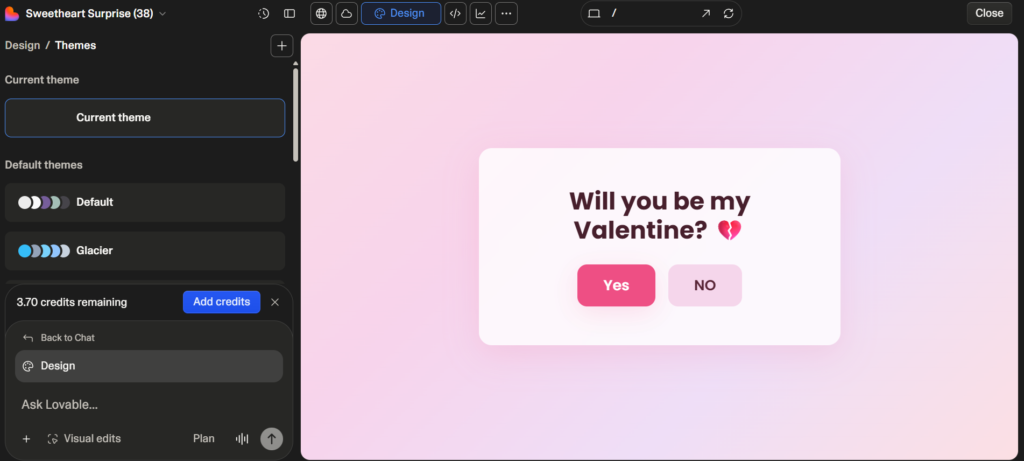
Show a centered card with the question:
“Will you be my Valentine? 💔”Place two centered buttons below:
“Yes”
“NO”
When “Yes” is clicked:
Heading chage to Love you 💕
Reveal a romantic message:
“By choosing me, you agree to:
💕 Unlimited cuddles
💋 Endless kisses
🍕 Shared pizza forever
😂 Lifetime of bad jokes
Effective immediately, my love! 🚀💞”Smoothly fade out both buttons after 1 second (do not replace the container)
Animate two bears should hug in the center, then kiss 💋
Display floating love symbols (❤️ 💖 💕 💘 💞 🥰 💋) rising upward
Trigger a confetti celebration effect lasting 5 seconds
Keep all transitions smooth and natural, with no page reload
When “NO” is clicked:
The NO button should jump to random positions on the screen every click
The background should smoothly change pastel gradient colors
Show escalating cute begging messages like:
“Please say YES 🥺💖”
“Don’t break my heart 😭💔”
“I promise forever 😘✨”
“You’re my only Valentine 🥹🌹”
“I’ll cry forever if you say NO 😭💌”
“Okay okay… I BEG 😩❤️”
After two NO clicks, change the 💔 emoji in the question to 😭
Continue dodging until YES is clicked or the page is refreshed
Design & Style Requirements:
Soft romantic pastel gradients
Rounded UI elements with subtle glow and shadows
One consistent modern font across all text
Smooth hover effects and fluid motion transitions
Emotional, cute, teasing Valentine theme
The script must instantly work and only reveal/hide elements, never replacing the main container
Make the experience feel playful, magical, romantic, and shareable 💕🧸✨
The better your prompt, the better the result.
💡 Tip: Mention sections, style, colors, fonts, and features in your prompt.
💕 Step 2: Generate the Website Using Lovable AI
- Open Lovable AI.
- Enter your Valentine website prompt.
- Click generate.
- Wait for the AI to create the layout and design.
Within seconds, you’ll get a ready-made website structure including:
- Hero banner
- Romantic headings
- Beautiful layout
- Images or placeholders
- Sections like About, Gallery, Contact
🎨 Step 3: Use Visual Edits to Customize
One of the best features of Lovable AI is Visual Editing.
Here’s how you can customize:
✏️ Edit Text
- Click on any text section.
- Change names, love messages, or quotes.
- Add personalized messages for your partner.
🖼️ Replace Images
- Click on image blocks.
- Upload your own couple photos.
- Adjust image size and alignment.
🧱 Rearrange Sections
- Drag and drop sections.
- Move the gallery above the love story.
- Add new sections like “Our Memories.”
Visual editing makes everything simple — no coding required.
🌸 Step 4: Apply Romantic Themes
Themes help change the overall look of your website instantly.
How to Use Themes:
- Go to the Themes section.
- Choose a romantic or elegant theme.
- Preview different styles.
- Apply the one you like best.
For Valentine’s websites, look for themes with:
- Soft gradients
- Elegant fonts
- Rounded buttons
- Smooth animations
Themes give your website a professional and cohesive design.
❤️ Step 5: Customize Colors for a Romantic Feel
Colors play a huge role in Valentine designs.
Recommended Valentine Color Combinations:
- ❤️ Red + White
- 🌸 Pink + Cream
- 💜 Lavender + Soft Grey
- ❤️ Deep Red + Gold
How to Change Colors:
- Open the Design or Style settings.
- Change primary and secondary colors.
- Adjust background and button colors.
- Match text colors for readability.
Keep colors soft and balanced. Avoid too many bright tones together.
✨ Step 6: Add Special Valentine Elements
Make your website extra special by adding:
- 💘 Animated hearts
- ⏳ Countdown timer to Valentine’s Day
- 💌 Love letter section
- 📸 Memory gallery
- 🎵 Romantic background music
These small details make your website more engaging and emotional.
🚀 Step 7: Preview and Publish
Before publishing:
- Check mobile responsiveness.
- Test all buttons and forms.
- Review spelling and grammar.
- Make sure colors look consistent.
Once satisfied:
Click Publish and share the link with your loved one or audience.
🎯 Final Tips for a Perfect Valentine Website
✔ Keep the design simple and romantic
✔ Use high-quality images
✔ Don’t overcrowd with too many colors
✔ Add personal messages
✔ Focus on emotional storytelling
Conclusion
Creating a Valentine website with Lovable AI is easy, fast, and fun. With the help of a good prompt, visual edits, themes, and color customization, you can design a beautiful romantic website without technical skills.
Whether it’s for your partner, a surprise proposal, or a Valentine campaign — Lovable AI makes it simple to turn your idea into reality.